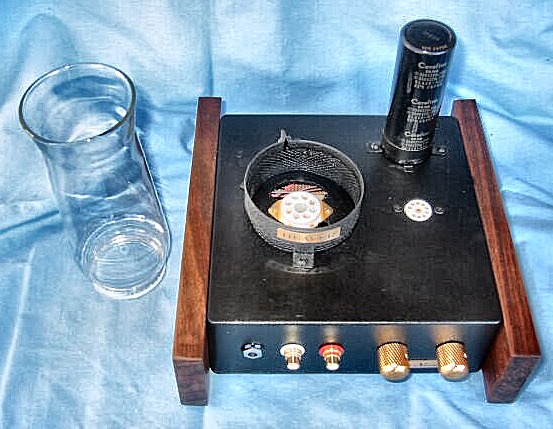
The concept is VERY old and VERY simple; using a cylinder to surround a heat source to draw air in the bottom of the cylinder and forcibly eject it out the top creating a Venturi Effect or "heat pump". Ie. a Chimney. No moving parts. No noise. No "static". No additional power source required................
Mark the chassis with a center punch at the exact center point where you want the tube to reside.
Using a compass draw two concentric circles ( three, if you plan to use a chassis mounted holding clamp, HIGHLY recommended ) on the box or a piece of paper for a template :
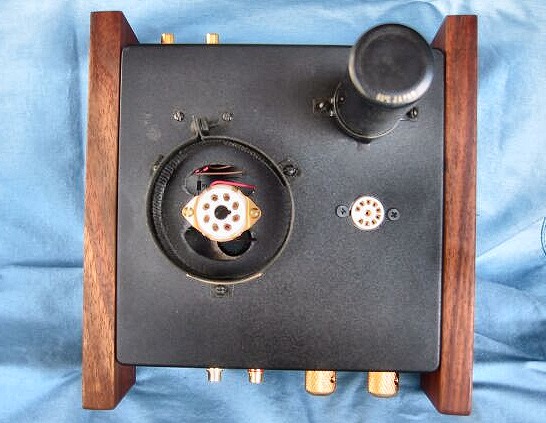
1. The inner circle is the dia. of the chassis hole punch you will use to mount the socket. Example: for an octal socket; 1 ¼ - 1 ½" .
2. The next larger circle is the inside dia. of chimney you plan to use. You want the chimney base to sit flat on the chassis for a good seal. Example: for a glass hurricane lantern chimney/globe ( excellent for most octal tube body shapes ) this is about 2 ½". BUT if you are not buying the "glass" in person make sure the seller measures the inside dia. of the base, NOT the outside dia. ( how they are usually listed ) or it may not fit over your tube!
3. For a clamp mounted chimney: attach the clamp to the chimney and tighten ( VERY loosely for glass; allow for thermal expansion ). Determine the dia. of a circle that will intersect the holes in the 2 or 3 mounting tabs on the clamp. Example: for a 3 tab, large electrolytic can capacitor clamp, this will be about 3 ½" dia. circle. Add this circle around the two others. This will assure that the chimney sides are exactly concentric to the tube glass, this is important for optimal convection updraft & cooling.
4. Draw a straight line through the center point and both sides of the two inner circles. This establishes the center line of the socket tabs. On either side, of the sections of this line between the two circles: carefully draw the sides of the two tabs to the proper width to firmly support the tube/socket/wire assembly. Keep in mind for later steps these two little rectangles will remain attached to the chassis side. a little like this (=( + )=)
5. Using a large a drill bit as possible drill out as much of the material BETWEEN the two inner circles as you can; BUT leaving the center disk & tabs intact & attached to the chassis. ( see next step ).
6. Carefully Drill & Punch the chassis socket hole in the center disk as usual. This should remove the center disk about completely, leaving just ragged scrap material hanging inward.
7. Using a nibbler, round & ¼ round files, hacksaw blade, Dremel tool, whatever you've got; remove the hanging trash material out to the outer ( second circle ) line leaving the two socket mounting tabs. Be as neat as required; a tube, chimney, and it's holder clamp will hide any "unevenness" :-)
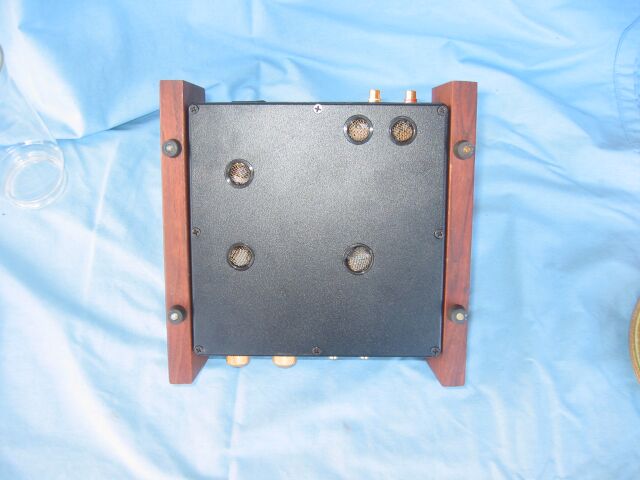
8. Position the socket on its tabs and the chimney clamp on the outer circle; mark and drill their respective mounting holes. "Drill & Punch" ventilation holes in the chassis ( if required ) for the intake of "room air". Try to position these under the hottest components. The sum of their area should be at least the area of the upper chimney vent for unrestricted airflow. Need I say, use "feet" or chassis bumpers to hold the chassis up off it's shelf or "whatever"!
You now have the optimal airway for cooling the tube and drawing room air up through the chassis ( often eliminating the need for a cooling fan and it's power source ). Ebay, Dietz Lanterns, and others on the web are a gold mine for glass chimneys in every shape, size, and color ( and lets the tubes shine through! J ).